Moto Empire Beginner Guide & First Bike Tips
Starting out in Moto Empire revolves around picking your first motorcycle, claiming early menu bonuses, and running accessible races to fund your initial upgrades. Because the game continues to receive major map and dealership updates, learning the core navigation and garage menus matters much more than chasing a single expensive showroom model on day one. This guide walks through your opening session choices, early budget priorities, and simple recovery steps when a ride goes wrong.
Choosing Your First Bike and Using the Dealership
When you begin playing Moto Empire, community gameplay footage shows a choice among three starter motorcycles. Choose a starter you like to begin riding. The official First Bike! badge specifically describes buying your first motorcycle; choosing a free starter does not by itself prove that badge was awarded. Once you have a starter ride in your inventory, you can immediately begin earning cash from driving, quests, and entry-level races without worrying about having made a wrong initial selection.
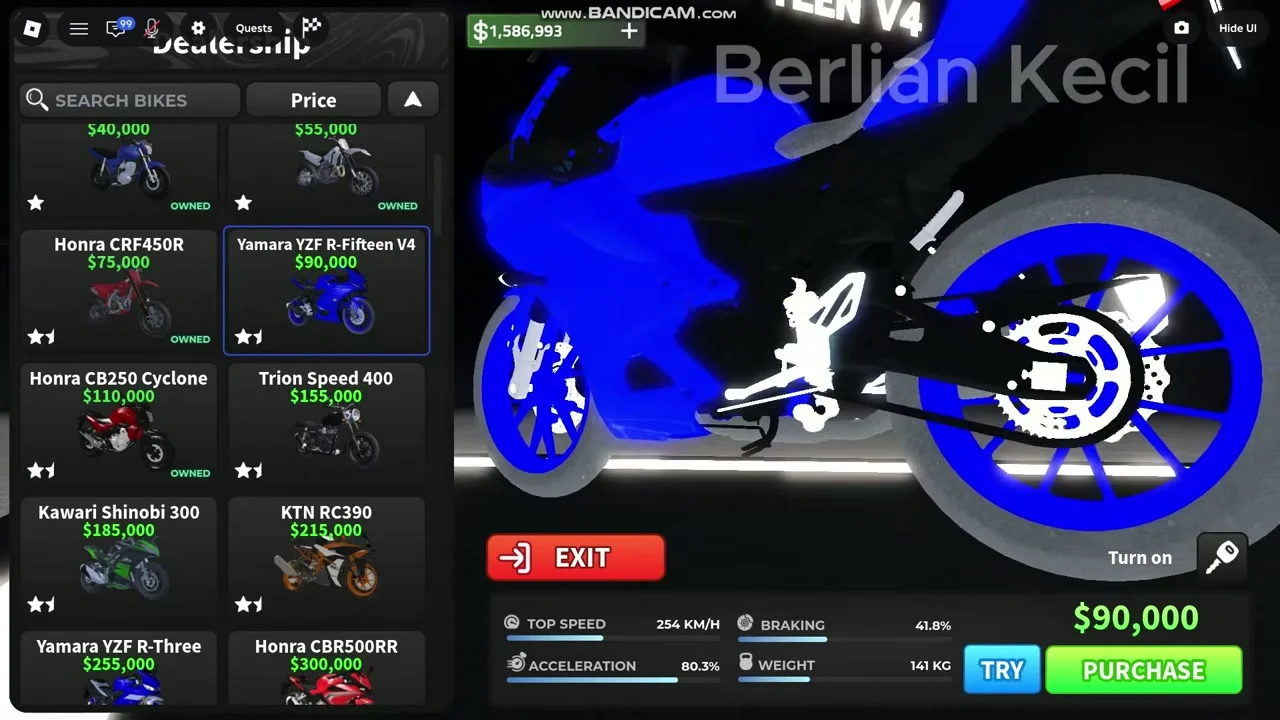
As your balance grows, visiting the dealership lets you inspect upgraded bikes before committing your money. In recorded November 2026 dealership menus, each listing displays stats such as top speed, acceleration, braking, and weight alongside buttons to Purchase, Try, or Exit. For example, community footage from November 11 shows the YAMARA YZF R-FIFTEEN V4 listed at $90,000 with a 204 KM/H top speed, 60% acceleration, 43% braking, and a 141 KG weight, while earlier November recordings highlight the Kawari Shinobi ZX4RR as the presenter's suggested early grinding option.
Because the dealership catalog and vehicle prices change across updates, treat any specific bike price from older videos as a snapshot rather than a permanent benchmark. For instance, late September footage showed a Kawari Shinobi H2R listed for $30,000,000, whereas later updates reworked the showroom lineup and added a separate limited showroom with Featured, Trade, Auction, and Index tabs. Always use the in-game Try option and compare the displayed stat bars on your current server before buying.
Your First Session Step-by-Step Routine
A structured opening session helps you build a comfortable cash cushion before you start experimenting with deeper tuning menus. By combining passive reward panels with fast map travel, you can avoid long, unproductive rides across empty roads when your bike is still completely stock. Follow this practical sequence during your first login to set up your account efficiently.
- Claim your initial starter motorcycle and spawn it on the road so your driving distance begins registering.
- Open the Shop menu, select the Codes tab, and redeem any current promotional codes such as GIGAUPDATE1 or INSANEDYNO while you are ready to ride actively.
- Check the Rewards and Quests panels to see which playtime tiles, daily login bonuses, and simple driving or wheelie tasks are currently tracking.
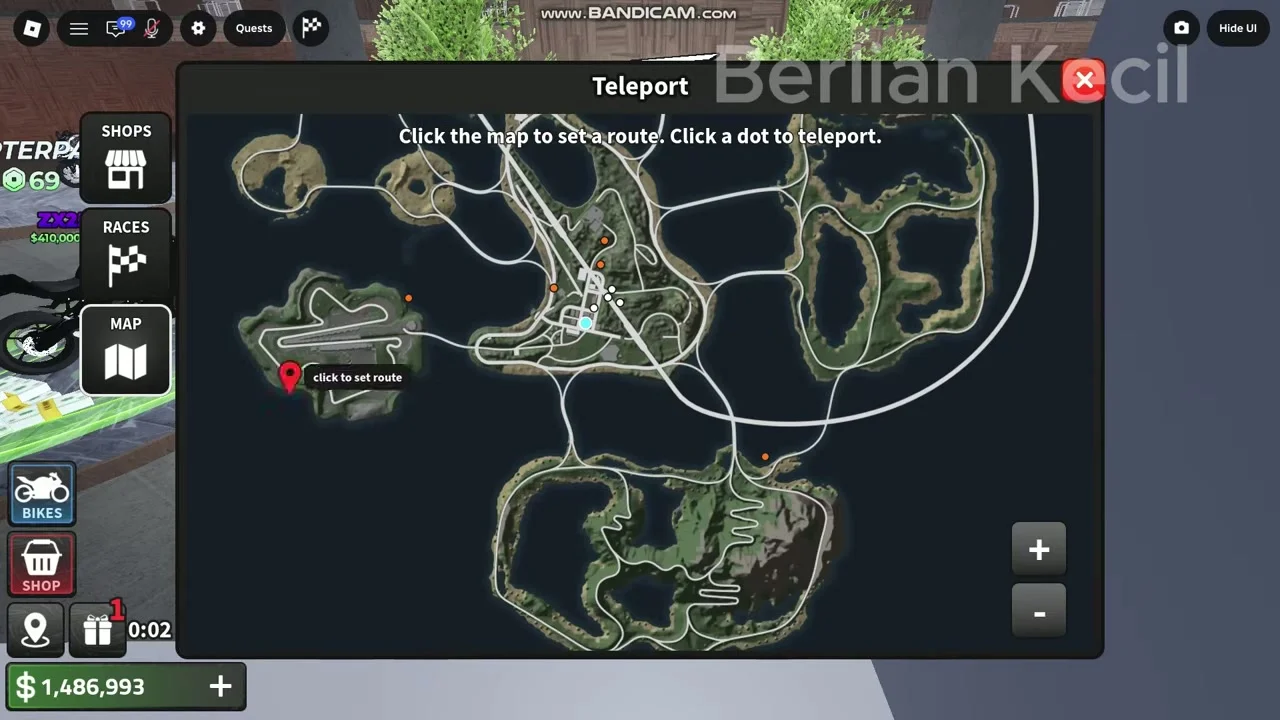
- Open the map screen, switch between the Shops, Races, and Map tabs, and click a location dot to teleport directly to a race hub or dealership.
- Enter an event with an available solo option, such as the recorded Mountain Race to earn your first race payouts and progress toward your daily task requirements.
Checking your active quests before you teleport to a race ensures your normal riding counts toward multiple goals at once. In recorded gameplay, the September daily quest list included tasks like riding a set distance, earning cash from normal driving, and finishing three races where solo runs count. Finishing your active tasks allows you to claim both individual task rewards and the overarching daily bonus.
Smart Early Spending: Bikes vs. Upgrades vs. Cosmetics
New riders often waste their first hundred thousand dollars on visual customization that provides zero speed advantage on the highway or race courses. Inside the tuning garage, the menu divides options into Performance, Appearance, and Modifications. While custom paint jobs, rim colors, stickers, and regional license plates look great, they do not improve your lap times, and certain options like exhaust flames can prompt a game pass purchase.
As a practical rule of thumb, focus your early budget on affordable performance tiers or a solid budget dealership bike before spending money in the Appearance tab. Upgrading core performance parts like your ECU, engine, exhaust, brakes, and weight reduction directly impacts how quickly you complete races and driving milestones. If you plan to switch to a stronger dealership motorcycle very soon, hold off on buying high-tier upgrades for your starter bike, because the garage shows the motorcycle you are currently modifying. Cross-bike transfer of purchased parts has not been verified.
How to Recover If You Get Stuck or Fall Through the Map
Because Moto Empire is still in active development and recently expanded to a three times bigger map, riders occasionally clip through terrain barriers or get wedged off-road after a high-speed crash. If your rider falls underneath the road surface or becomes trapped in scenery, you do not always need to leave the server. Community recordings demonstrate a simple recovery sequence using standard menus.
- Open the standard Roblox pause menu and use the respawn character option to return your avatar to a solid spawn point.
- Once your character loads back onto normal ground, open your vehicle spawn interface to summon your motorcycle again.
- If you are stranded far from main roads, open the in-game Map menu and click a teleport dot for a race hub or shop to reposition immediately.
While respawning your character and re-summoning your bike resolves typical map-falling glitches seen in gameplay footage, it is not guaranteed to fix every possible server bug. Keeping the map teleport dots in mind gives you a fast backup way to get back to active hubs whenever a route leaves you isolated.
Official Progression Badges and Milestones
Moto Empire tracks several major account milestones through official Roblox badges. Reviewing these badges gives new players a clear picture of the core gameplay loop without forcing unnecessary grinding. For instance, while there is a badge for buying ten motorcycles, you do not need to hoard ten different bikes just to progress through races and tuning normally.
| Badge Name | Unlock Requirement | Progression Note |
|---|---|---|
| First Bike! | Buy your first motorcycle | Check your Roblox badge record after your first bike purchase. |
| Race Winner | Win your first race | Achievable through race events across the map. |
| Max Tuned! | Max out a motorcycle build at the tuning garage | The official badge description requires a maxed build; the exact required parts are not listed. |
| Collector | Purchase your tenth motorcycle | Optional collection milestone; not required for normal racing progression. |
Focusing on earning First Bike!, Race Winner, and eventually Max Tuned! on a capable mid-tier or high-tier motorcycle aligns naturally with growing your bank balance. Leave the Collector badge for later once you have surplus funds and want to experiment with multiple builds.